Introduction to Gluten-Free Vegan Bread: Gluten Free Vegan Bread Recipe
Baking gluten-free vegan bread presents a unique set of challenges, but the rewards are well worth the effort. The absence of gluten, a protein found in wheat, rye, and barley, requires careful attention to achieving the right texture and rise. Similarly, omitting eggs and dairy necessitates finding suitable replacements to bind the ingredients and create a moist, palatable loaf. However, the result is a bread that’s not only delicious but also offers significant nutritional advantages.
Gluten-free vegan bread offers a number of nutritional benefits compared to traditional wheat bread. Because many gluten-free flours are derived from grains like rice or quinoa, they often boast a higher concentration of certain vitamins and minerals. For example, many gluten-free blends include quinoa, which is a complete protein containing all nine essential amino acids. Furthermore, eliminating gluten can be beneficial for individuals with gluten sensitivities or celiac disease. The absence of dairy also makes this bread a suitable option for those with lactose intolerance.
Ingredient Selection for Optimal Texture and Flavor
The success of gluten-free vegan bread hinges significantly on choosing the right ingredients. Different gluten-free flours have varying properties; some absorb more liquid than others, while some impart a slightly different flavor profile. For example, almond flour tends to produce a denser bread, while a blend of rice flour, tapioca starch, and potato starch often yields a lighter crumb. The use of xanthan gum or psyllium husk powder is crucial as these act as binders, mimicking the role of gluten in creating a cohesive dough. Furthermore, the choice of leavening agent – baking powder or yeast – impacts the final texture and rise. Using a combination of different flours often produces the best results, creating a balanced texture and flavor. Experimentation with different ratios is key to finding your perfect blend. For instance, a blend of brown rice flour, tapioca starch, and a small amount of potato starch creates a slightly more tender crumb than a blend of just rice flour and tapioca starch. The addition of flax eggs or applesauce can further enhance moisture and binding.
Essential Ingredients and Substitutions

Baking gluten-free vegan bread requires careful consideration of ingredients to achieve a desirable texture and flavor. Understanding the function of each component is key to successful baking. This section will Artikel five essential ingredients, explore suitable substitutions, and delve into the nuances of different gluten-free flour blends and vegan egg replacements.
Gluten free vegan bread recipe – Creating a delicious gluten-free vegan loaf hinges on selecting the right ingredients and understanding their roles. Let’s explore the building blocks of our bread.
Essential Ingredients and Their Functions
| Ingredient | Function | Substitutions | Notes |
|---|---|---|---|
| Gluten-Free Flour Blend | Provides structure and bulk; the base of the bread. | Various blends are possible (see below); experiment to find your preference. | A good blend typically includes a combination of starches and flours for optimal texture. |
| Water | Hydrates the flour, activates the leavening agent, and develops gluten (or its substitutes). | None, although the amount might need adjusting depending on the flour blend. | Using warm water can help activate yeast if used. |
| Leavening Agent (Baking Powder/Yeast) | Creates air pockets, resulting in a lighter and fluffier texture. Baking powder is for quick breads, yeast for slower fermentation. | Baking powder can replace yeast (though the bread will have a different flavor and texture). | Follow package instructions carefully for the correct amount. |
| Vegan Egg Replacer | Binds ingredients, adds moisture, and contributes to texture. | Flaxseed meal, chia seeds (mixed with water), applesauce, mashed banana. | Experiment to find your favorite; each will impact the final texture slightly differently. |
| Oil (or other fat) | Adds moisture, richness, and tenderness. | Olive oil, melted coconut oil, applesauce. | The type of oil can subtly influence the flavor. |
Gluten-Free Flour Blend Comparisons
Choosing the right gluten-free flour blend is crucial. Different flours offer unique properties, impacting the final bread’s texture and taste. There’s no single “best” blend; it often depends on personal preference and the desired outcome.
Almond Flour: Offers a naturally nutty flavor and relatively high protein content. However, it can result in a denser bread compared to blends with more starch. It absorbs moisture quickly, so adjustments to liquid might be needed.
Rice Flour: Provides a light and fluffy texture, but can result in a crumbly loaf if used alone. It often forms part of a blend to improve the overall texture.
Tapioca Flour/Starch: Acts as a binder and adds moisture, resulting in a chewier texture. It’s frequently used in combination with other flours to prevent a gummy texture.
Many commercially available gluten-free flour blends combine these and other flours (like sorghum or potato starch) for a balanced result. Experimentation is key to discovering your preferred blend.
Vegan Egg Replacement Impact on Texture
Vegan egg replacements play a significant role in the texture of gluten-free vegan bread. They provide binding, moisture, and contribute to the overall structure. The choice of replacement will subtly affect the final product.
Flaxseed meal and chia seeds, when mixed with water, create a gel-like consistency that effectively binds ingredients. They tend to produce a slightly denser bread compared to other options. Applesauce and mashed banana offer moisture and sweetness, resulting in a softer, potentially more moist crumb. The best choice depends on your desired texture and flavor profile.
Step-by-Step Baking Process
Making gluten-free vegan bread can seem daunting, but with the right technique and a little patience, you’ll be rewarded with a delicious loaf. This recipe focuses on simplicity and achieving a consistently good texture. Remember, the key is to carefully follow the steps and understand why each one is important.
This recipe utilizes a blend of gluten-free flours for optimal texture and rise. We’ll be focusing on a simple mixing method to avoid overworking the dough, a common culprit of gummy gluten-free bread. The baking temperature and time are crucial for achieving that perfect golden-brown crust and a soft, tender crumb.
Mixing the Dough
Proper mixing is paramount in gluten-free baking. Unlike traditional wheat dough, gluten-free doughs lack the elasticity provided by gluten. Overmixing can lead to a tough and gummy final product. Gentle folding and incorporating the wet ingredients gradually are key to success.
- In a large bowl, whisk together 1 ½ cups gluten-free all-purpose flour blend (I recommend a blend containing brown rice flour, tapioca starch, and potato starch), ½ cup tapioca starch, 2 teaspoons baking powder, 1 teaspoon baking soda, and ½ teaspoon salt.
- In a separate bowl, combine 1 cup unsweetened applesauce, ½ cup unsweetened almond milk (or other plant-based milk), 2 tablespoons olive oil, and 1 tablespoon apple cider vinegar.
- Gradually add the wet ingredients to the dry ingredients, gently folding with a spatula or wooden spoon until just combined. Avoid overmixing; a few lumps are okay.
- Stir in ½ cup chopped walnuts or pecans (optional) for added flavor and texture.
Baking the Bread
Baking temperature and time are crucial for achieving the desired texture and crust. Too low a temperature results in a dense loaf, while too high a temperature can lead to burning before the inside is cooked through. The baking time depends on your oven, so it’s always best to check for doneness early.
- Pour the batter into a greased 8×4 inch loaf pan.
- Bake in a preheated oven at 350°F (175°C) for 50-60 minutes, or until a wooden skewer inserted into the center comes out clean. Start checking for doneness around the 50-minute mark.
- Let the bread cool in the pan for 10 minutes before transferring it to a wire rack to cool completely.
Troubleshooting Common Problems
Even with careful preparation, sometimes things don’t go exactly as planned. Here are some common issues and how to address them:
- Dense Loaf: This often happens when the baking powder or baking soda is old or the dough was overmixed. Ensure your leavening agents are fresh and mix the dough gently. Increasing the baking temperature slightly (by 10-15°F) might also help.
- Crumbly Texture: A crumbly texture can result from using too much starch or not enough liquid. Next time, try reducing the amount of starch by a tablespoon or two and increasing the liquid by a tablespoon or two. You can also experiment with adding a flax egg (1 tablespoon flaxseed meal mixed with 3 tablespoons water) for extra binding.
- Burnt Crust: If the crust is burning before the inside is cooked, try reducing the oven temperature by 25°F or tenting the loaf loosely with aluminum foil during the last 15-20 minutes of baking.
Recipe Variations and Flavor Enhancements
This gluten-free vegan bread recipe is incredibly versatile! The base recipe provides a fantastic foundation, but the real fun begins when you experiment with different flavors and textures. Let’s explore some exciting variations to elevate your bread-baking game. You can easily tailor this recipe to suit any meal or occasion, from a simple breakfast toast to a sophisticated accompaniment to a hearty soup.
Recipe Variations
Below is a table outlining three distinct variations of the basic recipe, each offering a unique flavor profile. These are merely starting points; feel free to combine elements or add your own creative twists!
| Variation | Added Ingredients | Flavor Profile | Notes |
|---|---|---|---|
| Savory Herb Bread | 2 tablespoons chopped fresh rosemary, 1 tablespoon chopped fresh thyme, 1 teaspoon dried oregano, 1/4 cup nutritional yeast | Earthy, aromatic, slightly savory | The nutritional yeast adds a cheesy flavor. Consider adding sun-dried tomatoes for extra depth. |
| Sweet Cinnamon Raisin Bread | 1/2 cup raisins, 2 tablespoons cinnamon, 1/4 cup maple syrup (reduce water slightly) | Warm, sweet, slightly spicy | The maple syrup adds moisture and sweetness. Adjust the amount of cinnamon to your preference. Consider adding chopped walnuts for added texture. |
| Savory Sunflower Seed and Onion Bread | 1/2 cup sunflower seeds, 1/4 cup finely chopped red onion, 1 teaspoon garlic powder | Nutty, savory, slightly pungent | The sunflower seeds add a delightful crunch. Toasting the seeds beforehand will enhance their flavor. The red onion adds a nice bite. |
Adding Nuts, Seeds, and Dried Fruits
Incorporating nuts, seeds, or dried fruits not only enhances the texture of your bread but also boosts its nutritional value. For example, adding chopped walnuts provides healthy fats and a rich, buttery flavor. Sunflower seeds contribute a pleasant crunch and a good source of vitamin E. Dried cranberries add sweetness and a chewy texture. Remember to adjust the liquid content slightly if adding ingredients that absorb moisture. For instance, if adding a significant amount of dried fruit, you may need to reduce the water by a tablespoon or two to prevent a gummy texture.
Incorporating Herbs and Spices
Herbs and spices are your secret weapons for creating unique and flavorful bread. Experimenting with different combinations can lead to exciting results. For instance, a blend of rosemary, thyme, and oregano creates a classic herby bread. Adding cinnamon and nutmeg produces a warm, comforting aroma. Consider using freshly ground spices for the most intense flavor. Start with small amounts and taste as you go, adjusting the quantities to achieve your desired flavor profile. Remember that the flavors will deepen as the bread bakes.
Storage and Serving Suggestions

Making delicious gluten-free vegan bread is only half the battle; keeping it fresh and finding creative ways to enjoy it is just as important! Proper storage is key to preventing it from drying out and losing its delightful texture. Let’s explore the best ways to store, serve, and even repurpose your homemade loaf.
Proper storage significantly impacts the longevity and quality of your gluten-free vegan bread. Unlike traditional wheat bread, gluten-free loaves tend to dry out more quickly due to the absence of gluten, which provides structure and moisture retention. Therefore, understanding the best storage methods is crucial to maximizing its deliciousness.
Bread Storage Methods
To maintain freshness, store your gluten-free vegan bread in an airtight container at room temperature for up to three days. A bread box works well, or you can use a resealable plastic bag or a container with a tight-fitting lid. If you anticipate not using the entire loaf within three days, freezing is your best bet.
Serving Suggestions
This bread is incredibly versatile! It’s perfect for making sandwiches, either with savory fillings like hummus and vegetables or classic combinations like vegan cheese and tomato. Toasting slices enhances the slightly crisp texture, making it ideal for avocado toast or even French toast. Cubed, it makes fantastic croutons for salads or soups, adding a satisfying crunch. Think beyond the usual – try it with a flavorful vegan spread, like a sun-dried tomato pesto, for an elevated experience.
Freezing and Reheating
Freezing your gluten-free vegan bread is a fantastic way to extend its shelf life. Slice the bread before freezing to make it easier to portion and reheat individual slices as needed. Wrap each slice tightly in plastic wrap, then place them in a freezer-safe bag. This prevents freezer burn and maintains quality for up to three months. To reheat, simply toast the frozen slices in a toaster or oven until warmed through. Avoid microwaving, as this can make the bread soggy.
Repurposing Leftover Bread
Don’t let leftover bread go to waste! It’s a fantastic base for many delicious recipes. Make vegan bread pudding by combining cubed bread with plant-based milk, sugar, spices, and raisins, then baking until set and golden. Alternatively, you can easily make breadcrumbs by pulsing leftover bread in a food processor until finely ground. These breadcrumbs are perfect for coating vegan cutlets or adding texture to casseroles and meatballs. The possibilities are endless!
Visual Representation of Bread Texture
Achieving the perfect texture in gluten-free vegan bread requires careful attention to ingredients and baking technique. The visual appearance of the loaf is a strong indicator of its success, revealing much about its internal structure and overall quality. Understanding these visual cues can help you refine your baking skills and consistently produce delicious, satisfying bread.
The ideal texture of a well-baked gluten-free vegan loaf is a complex interplay of crumb structure, moisture content, and elasticity. A visually appealing loaf will present itself as a testament to a successful bake.
Ideal Gluten-Free Vegan Bread Texture
A well-baked gluten-free vegan loaf should exhibit several key textural characteristics visible to the eye. These characteristics are indicative of proper ingredient ratios, sufficient hydration, and appropriate baking time and temperature. The visual assessment should consider the following:
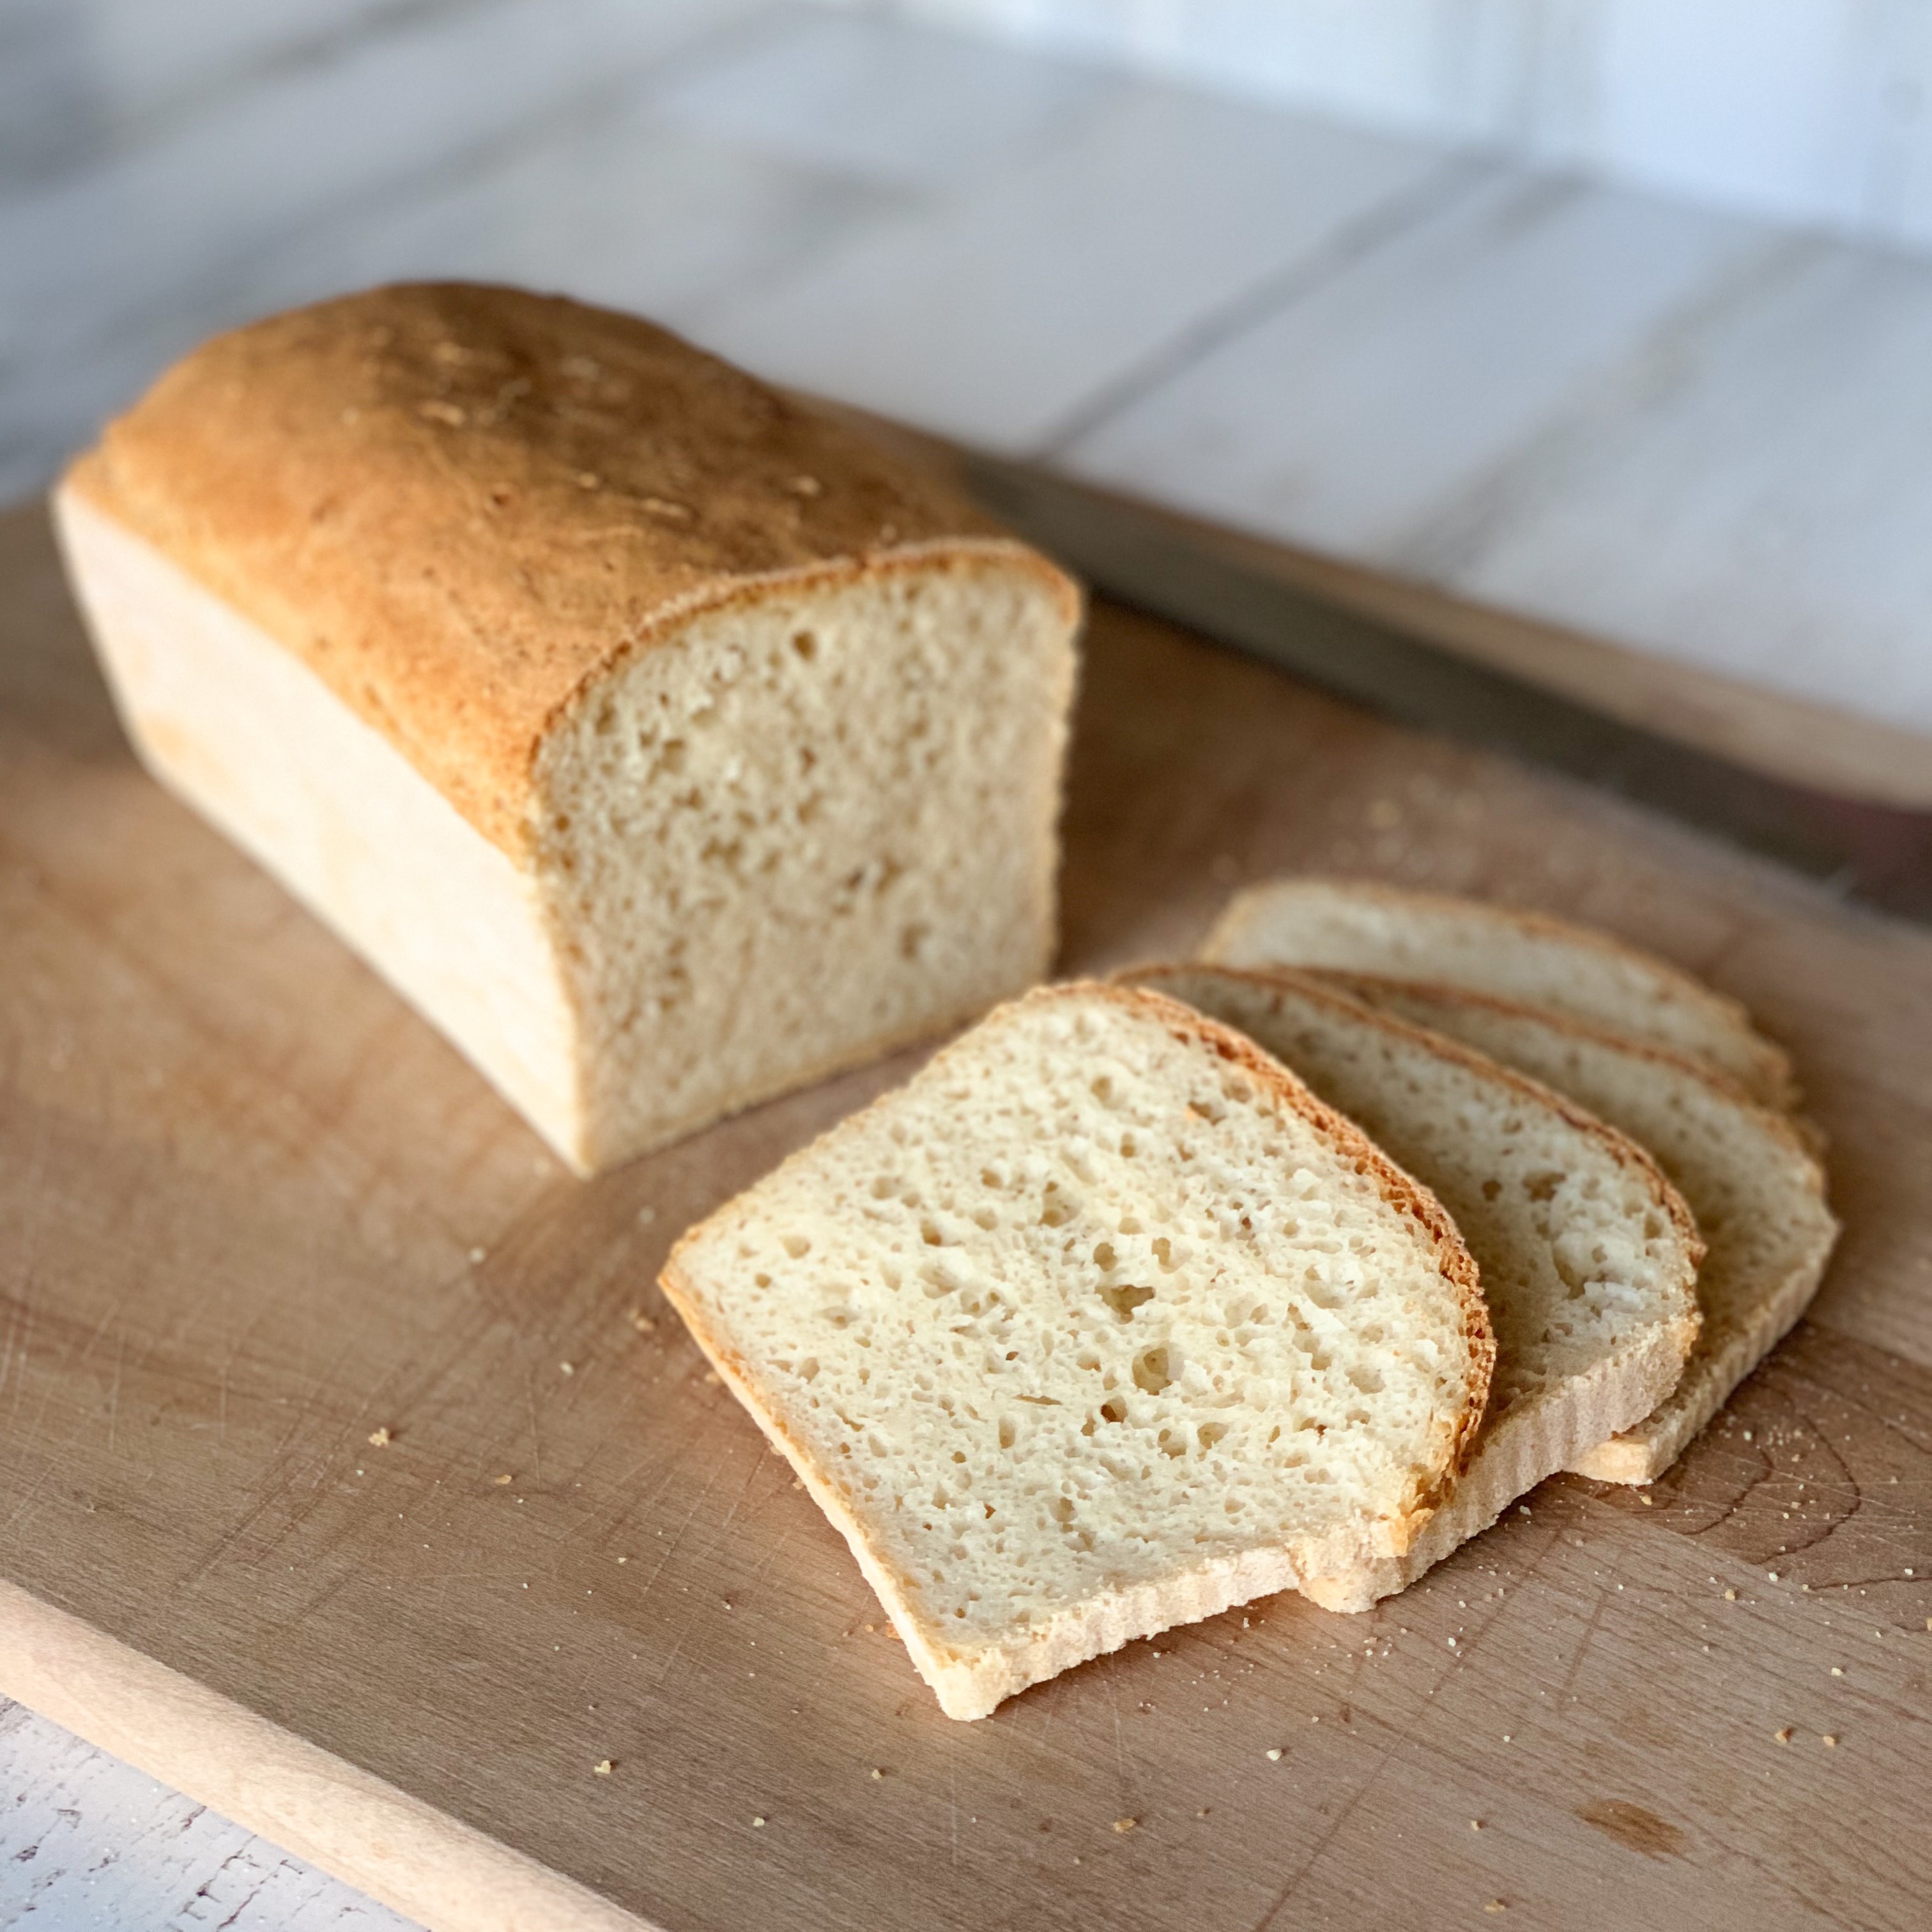
- Crumb Structure: The crumb should be relatively uniform, with small to medium-sized air pockets evenly distributed throughout. Imagine a fine, open honeycomb structure. Avoid large, irregular holes or a dense, compacted crumb. A visually appealing crumb displays a consistent pattern and texture.
- Moisture Content: The loaf should appear moist but not soggy. The crumb should have a slight sheen, and it shouldn’t appear dry or cracked. A well-hydrated crumb will have a softer appearance, while a dry crumb will appear dull and possibly slightly shrunken.
- Elasticity: While not directly visible, the elasticity can be inferred from the crumb’s structure. A slightly springy crumb, indicated by a gentle resistance when pressed gently, suggests good gluten-free flour blend and hydration. A crumb that collapses easily indicates insufficient structure.
Poorly Baked vs. Well-Baked Loaf, Gluten free vegan bread recipe
The visual differences between a poorly baked and a well-baked gluten-free vegan loaf are significant. Comparing these differences helps bakers identify areas for improvement in their technique.
A poorly baked loaf might exhibit a dense, compact crumb with few to no visible air pockets. The crust might be overly hard or cracked, indicating insufficient moisture. The overall appearance might be pale and unappetizing, lacking the golden-brown hue of a properly baked loaf. The crumb might also be dry and crumbly, falling apart easily. In contrast, a well-baked loaf boasts a light and airy crumb with evenly distributed air pockets, a consistent golden-brown crust, and a moist, slightly springy texture.
Imagine comparing two slices of bread side-by-side: one with a dense, heavy crumb that looks almost solid, and another with a light and airy crumb where you can clearly see the small, evenly spaced air pockets. The difference in visual appeal is dramatic, reflecting the vastly different eating experiences.


